Tuesday, February 21, 2012
Set Up an RPM Build Environment under CentOS
Friday, February 10, 2012
First, make sure EPEL repo is enabled. Type the following command to install cacti:
# yum install cacti
Install cacti tables
Type the following command to find out cacti.sql path:
# rpm -ql cacti | grep cacti.sql
Sample output:
/usr/share/doc/cacti-0.8.7d/cacti.sql
Type the following command to install cacti tables (you need to type the cacti user password):
# mysql -u cacti -p cacti < /usr/share/doc/cacti-0.8.7d/cacti.sql
Configure cacti Open /etc/cacti/db.php file, enter:
# vi /etc/cacti/db.php Make changes as follows: /* make sure these values refect your actual database/host/user/password */
$database_type = "mysql";
$database_default = "cacti";
$database_hostname = "localhost";
$database_username = "cacti";
$database_password = "zYn95ph43zYtq";
$database_port = "3306";
Save and close the file.
Configure httpd Open /etc/httpd/conf.d/cacti.conf file, enter:
# vi /etc/httpd/conf.d/cacti.conf
You need to update allow from line. Either set to ALL or your LAN subnet to allow access to cacti:
# # Cacti: An rrd based graphing tool # Alias /cacti /usr/share/cacti
Order Deny,Allow
Deny from all
Allow from 10.0.0.0/8
Another option is create /usr/share/cacti/.htaccess file and password protect the directory. Finally, restart httpd:
# service httpd restart
Setup cacti cronjob
Open /etc/cron.d/cacti file, enter:
# vi /etc/cron.d/cacti
Uncomment the line:
*/5 * * * * cacti /usr/bin/php /usr/share/cacti/poller.php > /dev/null 2>&1
Save and close the file.
Run cacti installer
Now cacti is ready to install. Fire a webbrowser and type the url:
http://your.example.com/cacti/
OR
http://your.server.ip.address/cacti/
Installing Cacti on CentOS 5
https://www.linux.com/learn/tutorials/38270-installing-cacti-on-centos-5
But in case Link is lost, here's the entire instructions:
Cacti is a GPL-licensed, scalable, RRDtool-based monitoring program with flexible graphing options. This article describes the process of installing and configuring Cacti on CentOS 5.2.
Useful links to this installation were BXtra and TechDB.
Per the Cacti documentation, Cacti requires:
RRDTool 1.0.49 or 1.2.x or greater
MySQL 4.1.x or 5.x or greater
PHP 4.3.6 or greater, 5.x greater highly recommended for advanced features
A Web Server e.g. Apache or IIS
I'd also recommend installing vim, net-snmp, net-snmp-utils, php-snmp, initscripts, perl-rrdtool, and any dependencies.
To perform this install, I am logged into Gnome as a normal user, and opened a terminal that is switched to the root user using the su command. I had already installed apache, mysql, and PHP during the original install process of CentOS 5.2.
I added a new repository to facilitate this install. To do this, I created a file
(/etc/yum.repos.d/dag.repo) containing Dag Wiers repository, which contains rrdtool, among other things.
You can create this file by typing vim /etc/yum.repos.d/dag.repo and copying and pasting the above information into the file. Be warned that the above text containing the repository is version and architecture-specific.[dag]
name=Dag RPM Repository for Red Hat Enterprise Linux
baseurl=http://apt.sw.be/redhat/el5/en/i386/dag
gpgcheck=1
gpgkey=http://dag.wieers.com/rpm/packages/RPM-GPG-KEY.dag.txt
enabled=1
I then typed yum update to update CentOS and the repository list before installing additional software.
I installed everything but cacti through yum. You can verify that you have the packages in question (or the version numbers of installed packages) by attempting to install them, as yum will remind you that you already have the latest version installed, as well as the version status of the packages, as shown here:
# yum install php httpd mysql mysql-server php-mysql vim-enhanced net-snmp net-snmp-utils php-snmp initscripts perl-rrdtool rrdtool initscriptsDownload the latest version of Cacti (0.8.7e, as of the writing of this article) from here. I downloaded it to my desktop and unzipped it by right clicking it and selecting "Extract here". I also renamed the cacti-0.8.7e directory by right clicking and selecting "Rename". You could do this in the command line, if you wanted to:
Loaded plugins: fastestmirror, priorities
Loading mirror speeds from cached hostfile
* base: pubmirrors.reflected.net
* updates: mirror.fdcservers.net
* addons: chi-10g-1-mirror.fastsoft.net
* extras: mirror.fdcservers.net
Setting up Install Process
Parsing package install arguments
Package php-5.1.6-23.2.el5_3.i386 already installed and latest version
Package httpd-2.2.3-22.el5.centos.1.i386 already installed and latest version
Package mysql-5.0.45-7.el5.i386 already installed and latest version
Package mysql-server-5.0.45-7.el5.i386 already installed and latest version
Package php-mysql-5.1.6-23.2.el5_3.i386 already installed and latest version
Package 2:vim-enhanced-7.0.109-4.el5_2.4z.i386 already installed and latest version
Package 1:net-snmp-5.3.2.2-5.el5_3.1.i386 already installed and latest version
Package 1:net-snmp-utils-5.3.2.2-5.el5_3.1.i386 already installed and latest version
Package php-snmp-5.1.6-23.2.el5_3.i386 already installed and latest version
Package initscripts-8.45.25-1.el5.centos.i386 already installed and latest version
Package perl-rrdtool-1.3.7-1.el5.rf.i386 already installed and latest version
Package rrdtool-1.3.7-1.el5.rf.i386 already installed and latest version
Package initscripts-8.45.25-1.el5.centos.i386 already installed and latest version
Nothing to do
[your root shell] # tar xzvf cacti-0.8.7e.tar.gzMove the entire cacti directory to /var/www/html/ :
[your root shell] # mv cacti-0.8.7e cacti
[your root shell] # mv cacti /var/www/htmlI chose to create a 'cactiuser' user (and cacti group) to run cacti commands and to have ownership of the relavent cacti files. It was here that I noticed that my install did not have any of the /sbin directories in its $PATH , so I simply typed the absolute path:
[your root shell] # /usr/sbin/groupadd cactiChange the ownership of the /var/www/html/cacti/rra/ and /var/www/html/cacti/log/ directories to the cactiuser we just created
[your root shell] # /usr/sbin/useradd -g cacti cactiuser
[your root shell] # passwd cactiuser
[your root shell] # cd /var/www/html/cactiCreate a mysql root password, if you haven't already (password in this example is samplepass:
[your root shell] # chown -R cactiuser rra/ log/
[your root shell] # /usr/bin/mysqladmin -u root password samplepassCreate a MySQL database for cacti:
[your root shell] # mysqladmin --user=root --password=samplepass create cactiChange directories to the cacti directory, and use the cacti.sql file to create tables for your database:
[your root shell] # cd /var/www/html/cacti
[your root shell- cacti] # mysql --user=root --password=samplepass cacti < cacti.sql
I also created a MySQL username and password for Cacti:
[your root shell] # mysql --user=root --password=samplepassEdit /var/www/html/cacti/include/config.php with your favorite editor, and update the information to reflect our cacti configuration (you can leave the other text in the file alone):
Welcome to the MySQL monitor. Commands end with ; or g.
Your MySQL connection id is 28
Server version: 5.0.45 Source distributionType 'help;' or 'h' for help. Type 'c' to clear the buffer.
mysql> GRANT ALL ON cacti.* TO cactiuser@localhost IDENTIFIED BY 'samplepass';
Query OK, 0 rows affected (0.00 sec)mysql> flush privileges;
Query OK, 0 rows affected (0.00 sec)mysql> exit
Bye
/* make sure these values refect your actual database/host/user/password */Create a cron job that polls for information for Cacti (I'm choosing to use /etc/crontab here):
$database_type = "mysql";
$database_default = "cacti";
$database_hostname = "localhost";
$database_username = "cactiuser";
$database_password = "samplepass";
$database_port = "3306";
[your root shell] # vim /etc/crontabAdd this line to your crontab:
*/5 * * * * cactiuser /usr/bin/php /var/www/html/cacti/poller.php > /dev/null 2>&1Edit your PHP config file at /etc/php.ini/memory_limit in command mode.
[your root shell] # vim /etc/php.ini
I changed memory_limit = 8M to memory_limit = 128M
Before I check to see if Cacti works, I want to check and see if mysqld and httpd are running using the service command.[your root shell] # /sbin/service mysqld statusIf mysqld and httpd are running, great. If not, type:
[your root shell] # /sbin/service httpd status
[your root shell] # /sbin/service mysqld startIf you're an "I need to see what the output looks like" type, here is an example of the previous command:
[your root shell] # /sbin/service httpd start
[your root shell] # /sbin/service mysqld status
mysqld is stopped
[your root shell] # /sbin/service mysqld start
Initializing MySQL database: Installing MySQL system tables...
OK
Filling help tables...
OKTo start mysqld at boot time you have to copy
support-files/mysql.server to the right place for your systemPLEASE REMEMBER TO SET A PASSWORD FOR THE MySQL root USER !
To do so, start the server, then issue the following commands:
/usr/bin/mysqladmin -u root password 'new-password'
/usr/bin/mysqladmin -u root -h localhost.localdomain password 'new-password'
See the manual for more instructions.
You can start the MySQL daemon with:
cd /usr ; /usr/bin/mysqld_safe &You can test the MySQL daemon with mysql-test-run.pl
cd mysql-test ; perl mysql-test-run.plPlease report any problems with the /usr/bin/mysqlbug script!
The latest information about MySQL is available on the web at
http://www.mysql.com
Support MySQL by buying support/licenses at http://shop.mysql.com
[ OK ]
Starting MySQL: [ OK ]

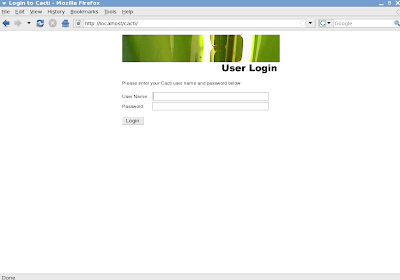
Figure 1
There should be a Cacti Installation Guide window that shows up, giving licensing info and the like. Click "Next".
Select "New Installation", since this is a new installation.
The next window to pop up should tell you whether Cacti could find the paths to all of the elements that Cacti needs to run, such as RRDtool, PHP, snmp stuff, etc. If everything but Cacti was installed via yum, you should be good here. Click "Finish" to save the settings and bring up the login window.
Figure 1 is a screenshot of the login window. The default user name is admin. The default password is admin. It should prompt an automatic password change for the admin account when you log in the first time.

Figure 2
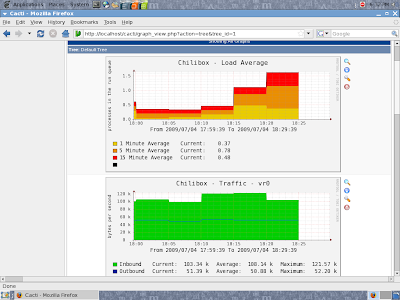
The localhost machine should have some graph templates that are already created, but you can click the "Create Additional Devices" link to add graphs for any other machines on your network. I added my FreeNAS box (tutorial for that to follow).

Figure 3
View the Cacti documentation page for more information on how to take advantage of Cacti's features.
Figures 2 and 3 display some graphs that were made using Cacti.
Visit zootlinux.blogspot.com for more tutorials and news!
Thursday, February 9, 2012
Binding jboss as7 to all interfaces
<interfaces>
    <interface name="management">
        <inet-address value="127.0.0.1"/>
    interface>
    <interface name="public">
        <inet-address value="0.0.0.0"/>
    interface>
interfaces>